Analysis with Dataflow: A Simple Dataflow Pipeline (Java)
Dataflow
Stamps
Initial conditions
Categories:
Setup and requirements
For each lab, you get a new Google Cloud project and set of resources for a fixed time at no cost.
-
Sign in to Qwiklabs using an incognito window.
-
Note the l
1:15:00), and make sure you can finish within that time.
There is no pause feature. You can restart if needed, but you have to start at the beginning. -
When ready, click Start lab.
-
Note your lab credentials (Username and Password). You will use them to sign in to the Google Cloud Console.
-
Click Open Google Console.
-
Click Use another account and copy/paste credentials for this lab into the prompts.
If you use other credentials, you'll receive errors or incur charges. -
Accept the terms and skip the recovery resource page.
Note: Do not click End Lab unless you have finished the lab or want to restart it. This clears your work and removes the project.
Activate Google Cloud Shell
Google Cloud Shell is a virtual machine that is loaded with development tools. It offers a persistent 5GB home directory and runs on the Google Cloud.
Google Cloud Shell provides command-line access to your Google Cloud resources.
-
In Cloud console, on the top right toolbar, click the Open Cloud Shell button.
-
Click Continue.

It takes a few moments to provision and connect to the environment. When you are connected, you are already authenticated, and the project is set to your PROJECT_ID. For example:

gcloud is the command-line tool for Google Cloud. It comes pre-installed on Cloud Shell and supports tab-completion.
- You can list the active account name with this command:
CODE...
Output:
Credentialed accounts:
 - @.com (active)
Example output:
Credentialed accounts:
 - google1623327_student@qwiklabs.net
- You can list the project ID with this command:
CODE...
Output:
[core]
project =
Example output:
[core]
project = qwiklabs-gcp-44776a13dea667a6
Note: Full documentation of gcloud is available in the gcloud CLI overview guide .
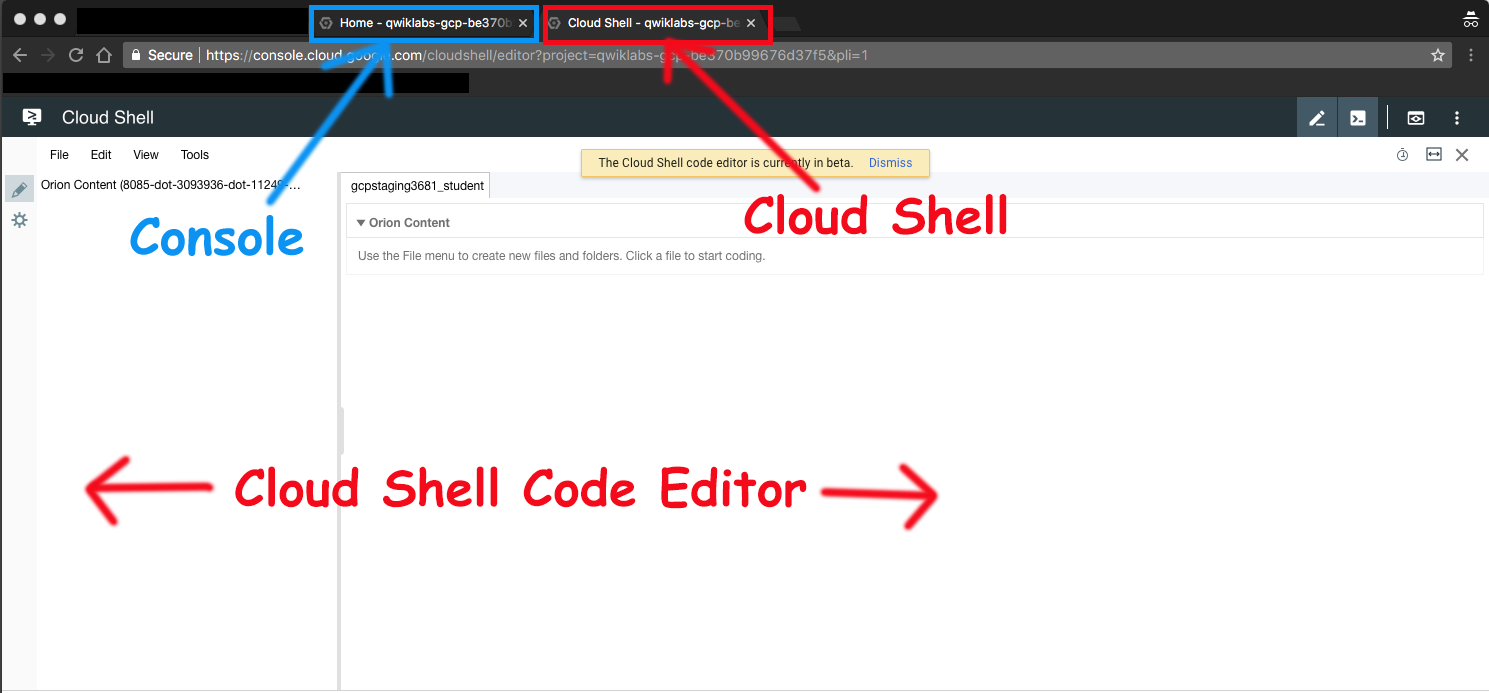
Launch Google Cloud Shell Code Editor
Use the Google Cloud Shell Code Editor to easily create and edit directories and files in the Cloud Shell instance.
- Once you activate the Google Cloud Shell, click Open editor to open the Cloud Shell Code Editor.

You now have three interfaces available:
- The Cloud Shell Code Editor
- Console (By clicking on the tab). You can switch back and forth between the Console and Cloud Shell by clicking on the tab.
- The Cloud Shell Command Line (By clicking on Open Terminal in the Console)
Check project permissions
Before you begin your work on Google Cloud, you need to ensure that your project has the correct permissions within Identity and Access Management (IAM).
-
In the Google Cloud console, on the Navigation menu (
), select IAM & Admin > IAM.
-
Confirm that the default compute Service Account
{project-number}-compute@developer.gserviceaccount.comis present and has theeditorrole assigned. The account prefix is the project number, which you can find on Navigation menu > Cloud Overview > Dashboard.
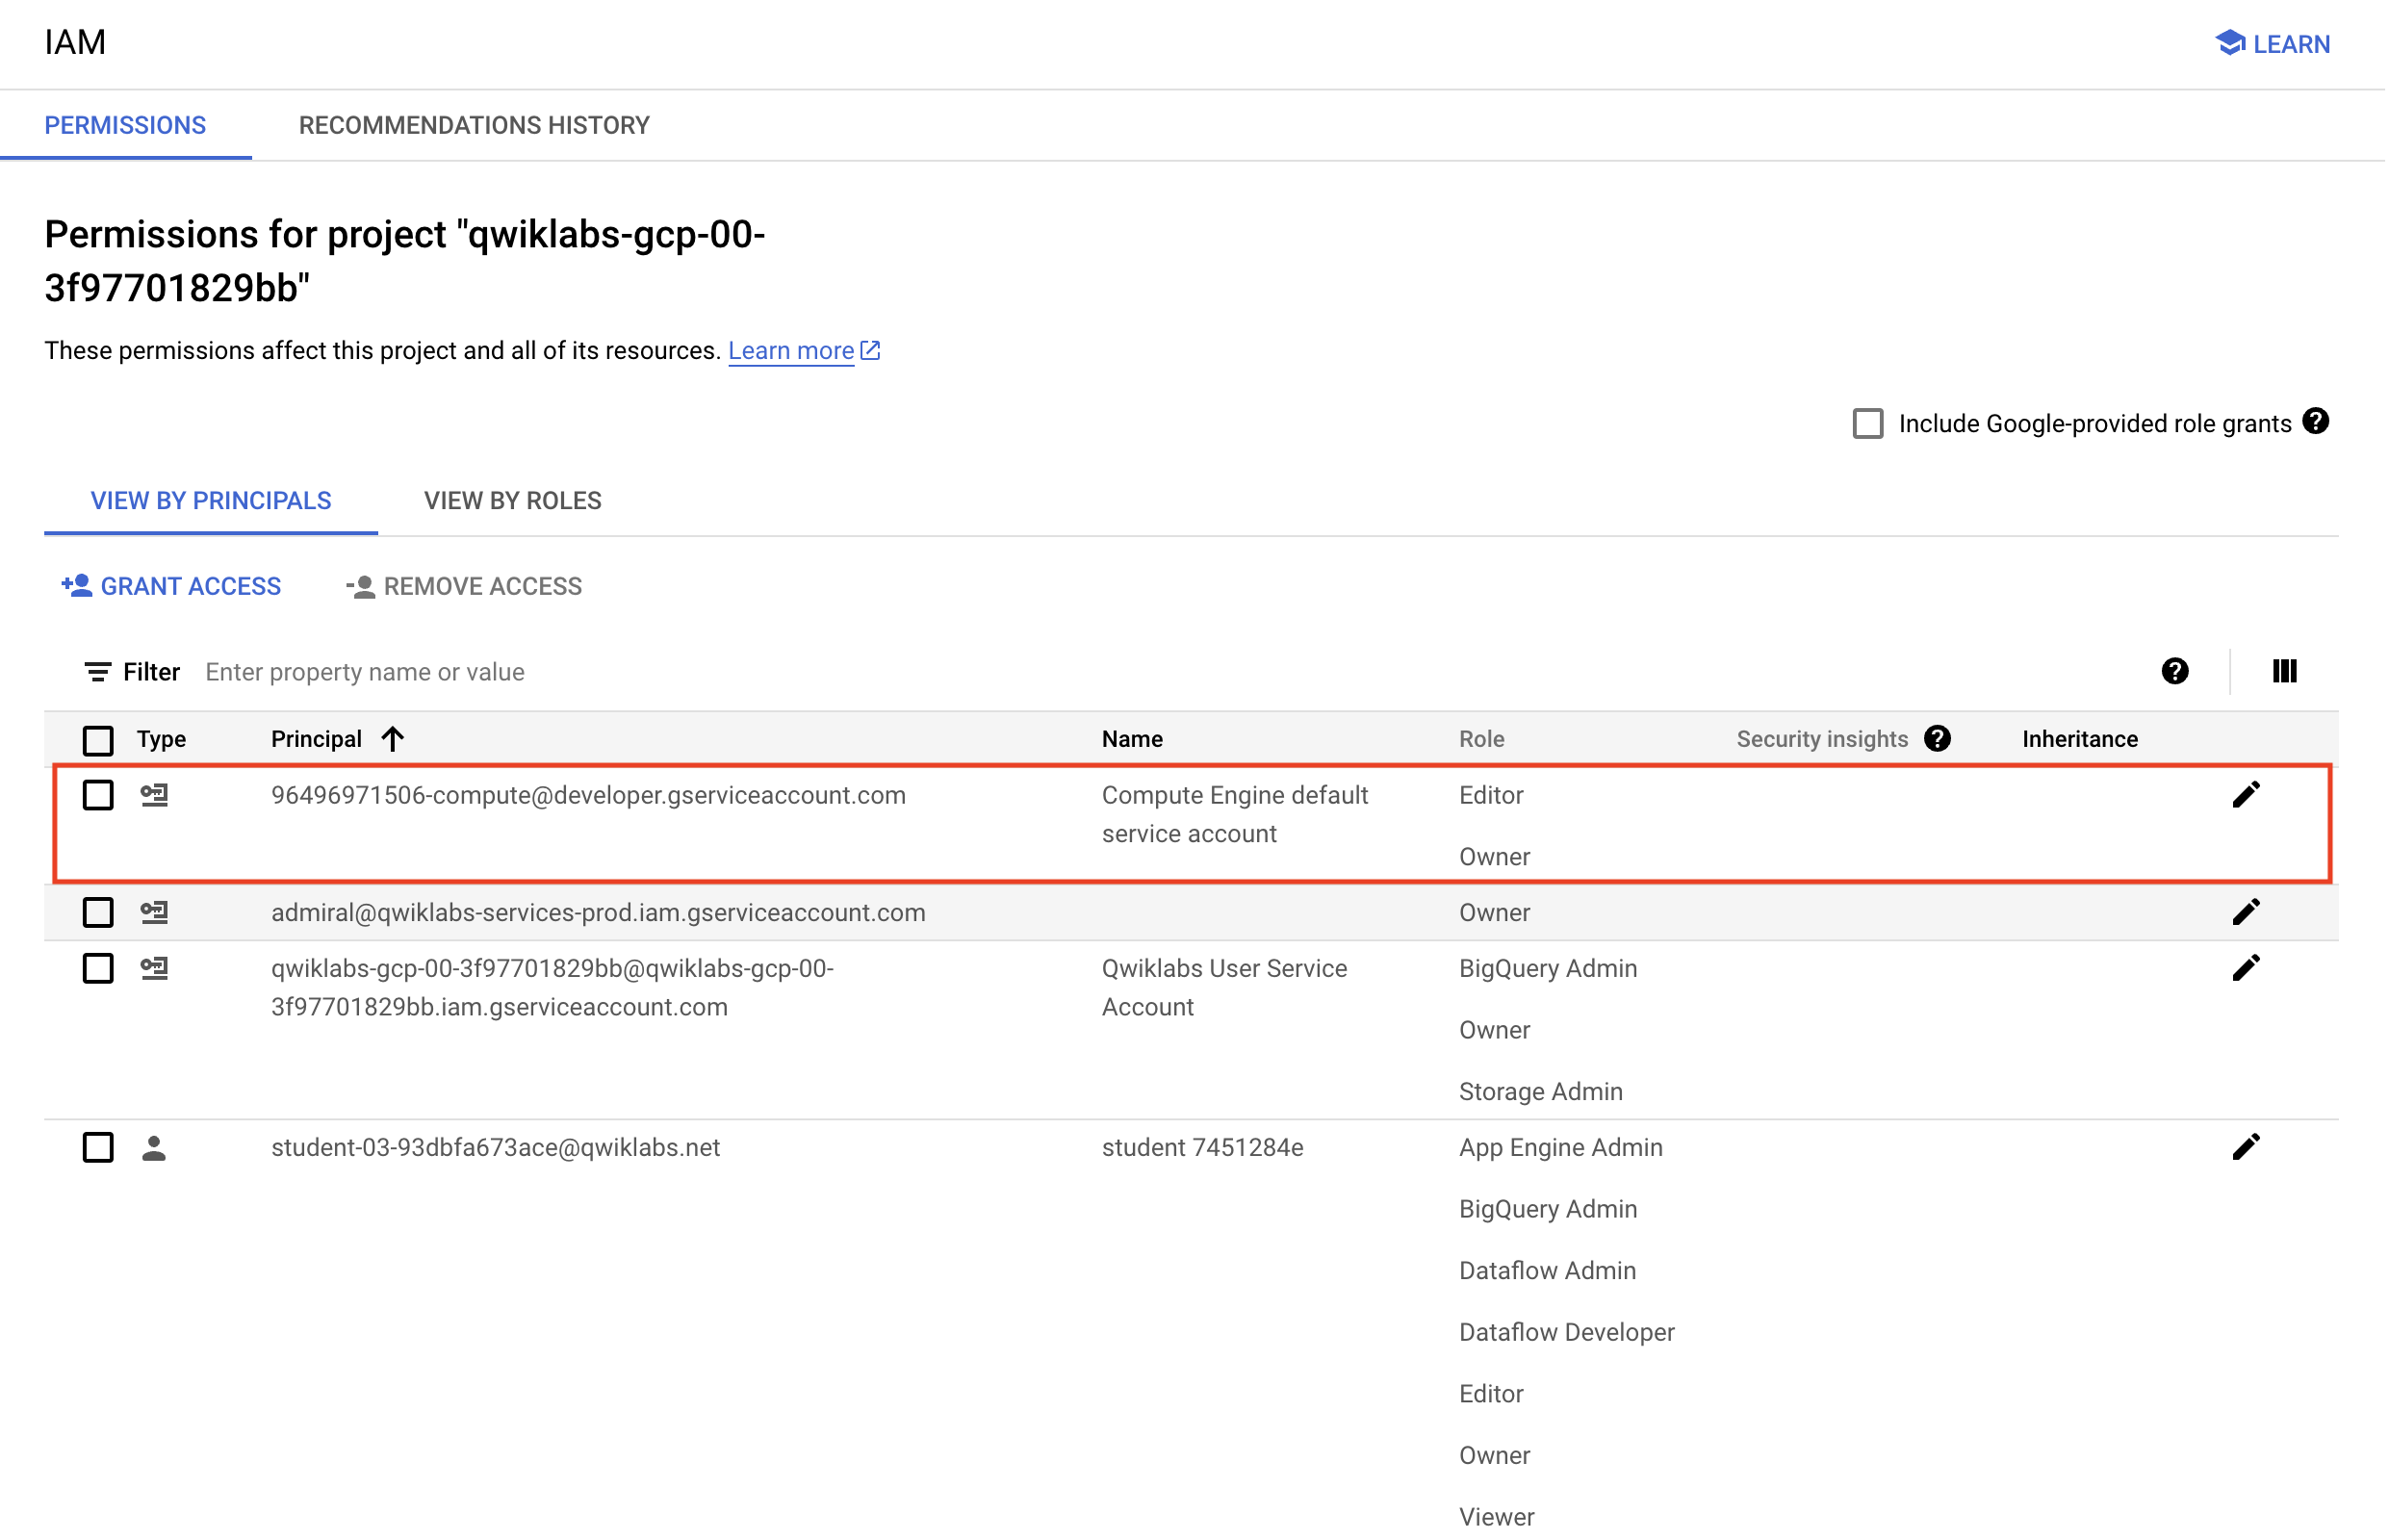
Note: If the account is not present in IAM or does not have the editor role, follow the steps below to assign the required role.
- In the Google Cloud console, on the Navigation menu, click Cloud Overview > Dashboard.
- Copy the project number (e.g.
729328892908). - On the Navigation menu, select IAM & Admin > IAM.
- At the top of the roles table, below View by Principals, click Grant Access.
- For New principals, type:
CODE...
- Replace
{project-number}with your project number. - For Role, select Project (or Basic) > Editor.
- Click Save.
Task 1. Preparation
Verify Bucket and Download Lab Code
Specific steps must be completed to successfully execute this lab:
-
Verify that you have a Cloud Storage bucket (one was created for you automatically when the lab environment started).
-
On the Google Cloud Console title bar, click Activate Cloud Shell. If prompted, click Continue. Clone the lab code github repository using the following command:
CODE...
- In Cloud Shell enter the following to create two environment variables. One named "BUCKET" and one named "REGION". Verify that each exists with the echo command:
CODE...
CODE...
Ensure that the Dataflow API is properly enabled
- In the Cloud Shell, run the following commands to ensure that the Dataflow API is enabled cleanly in your project.
CODE...
Task 2. Create a new Dataflow project
The goal of this lab is to become familiar with the structure of a Dataflow project and learn how to execute a Dataflow pipeline. You will use the powerful build tool Maven to create a new Dataflow project.
- Return to the browser tab containing Cloud Shell. In Cloud Shell navigate to the directory for this lab:
CODE...
- Copy and paste the following Maven command:
CODE...
- What directory has been created?
- What package has been created inside the src directory?
- Examine the Maven command that was used to create the lab code:
CODE...
- What directory will get created?
- What package will get created inside the src directory?
Task 3. Pipeline filtering
-
In the Cloud Shell code editor navigate to the directory
/training-data-analyst/courses/data_analysis/lab2. -
Then select the path
javahelp/src/main/java/com/google/cloud/training/dataanalyst/javahelp/and view the file Grep.java.
Alternatively, you could view the file with nano editor. Do not make any changes to the code.
CODE...
Can you answer these questions about the file Grep.java?
- What files are being read?
- What is the search term?
- Where does the output go?
There are three apply statements in the pipeline:
- What does the first apply() do?
- What does the second apply() do?
- Where does its input come from?
- What does it do with this input?
- What does it write to its output?
- Where does the output go to?
- What does the third apply() do?
Task 4. Execute the pipeline locally
- In Cloud Shell, paste the following Maven command:
CODE...
- The output file will be
output.txt. If the output is large enough, it will be sharded into separate parts with names like:output-00000-of-00001. If necessary, you can locate the correct file by examining the file's time:
CODE...
- Examine the output file:
CODE...
Does the output seem logical?
Task 5. Execute the pipeline on the cloud
- Copy some Java files to the cloud:
CODE...
-
In the Cloud Shell code editor navigate to the directory
/training-data-analyst/courses/data_analysis/lab2/javahelp/src/main/java/com/google/cloud/training/dataanalyst/javahelp -
Edit Dataflow pipeline in the file Grep.java:
CODE...
- Replace Input and Output variables with your Bucket name. Replace the variables as follows:
CODE...
CODE...
Note: Make sure that you changed the input and outputPrefix strings that are already present in the source code (do not copy-and-paste the entire line above without removing the initial strings because you will then end up with two of the same variables).
Example lines before:
CODE...
Example lines after editing containing your project's bucket name:
String input = "gs://qwiklabs-gcp-your-value-bucket/javahelp/*.java";
String outputPrefix = "gs://qwiklabs-gcp-your-value-bucket/javahelp/output";
5. Examine the script to submit the Dataflow to the cloud:
CODE...
What is the difference between this Maven command and the one to run locally?
- Submit the Dataflow job to the cloud:
CODE...
Because this is such a small job, running on the cloud will take significantly longer than running it locally (on the order of 2-3 minutes).
Example completion of command line:
[INFO] ------------------------------------------------------------------------
[INFO] BUILD SUCCESS
[INFO] ------------------------------------------------------------------------
[INFO] Total time: 01:50 min
[INFO] Finished at: 2018-02-06T15:11:23-05:00
[INFO] Final Memory: 39M/206M
[INFO] ------------------------------------------------------------------------
- Return to the browser tab for Console. On the Navigation menu (
Example:
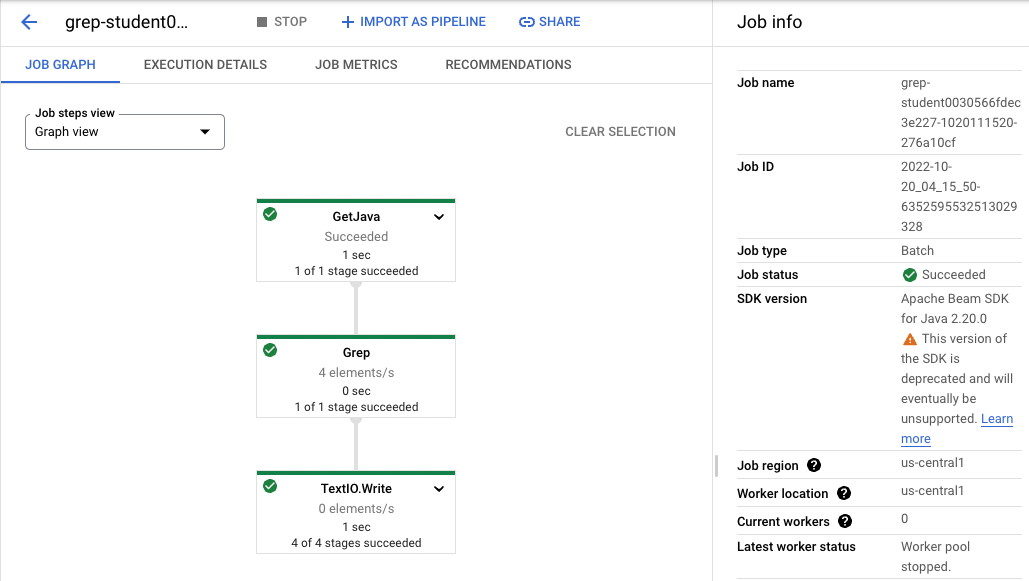
-
Wait for the job status to turn to Succeeded. At this point, your Cloud Shell will display a command-line prompt.
Note: If Dataflow job fails the first time, then re-run the previous command to submit a fresh
Dataflow jobto the cloud -
Examine the output in the Cloud Storage bucket. On the Navigation menu (
-
Click the javahelp directory. This job will generate the file
output.txt. If the file is large enough it will be sharded into multiple parts with names like:output-0000x-of-000y. You can identify the most recent file by name or by the Last modified field. Click on the file to view it.
Alternatively, you could download the file in Cloud Shell and view it:
CODE...
...